The Complete Online Guide to Knifemaking, BLADE HARDENING
It really cannot be emphasized how important proper heat treating is to the quality of the finished product. Before getting into the heat- treating process you need to familiarize yourself with some common terms and understand that the process of heat treating is different for each type of steel. The process also changes depending on how the blade was shaped. For example, a stock removal high carbon steel blade may only need to be heated, quenched, and tempered. The same material would also need to be normalized prior to heat treating if the blade had been hammer-forged. Knowledge of why and how each process works is the key. We have listed definitions and heat treating information below. You can also check out one of our how-to knife making tutorials on the subject.
Austenite
The process of heat treating revolves around heating steel to a point that it becomes non-magnetic. At this point, the steels internal crystal structure begins to become fluid. Steel at this critical temperature is called austenite. The non-magnetic state marks the very beginning of the austenite state. If you heat it any hotter, the steels crystal structure will increase in size. Growing grain causes steel to be less flexible and more prone to cracking during the quench cycle. The goal is to reach Austenite by confirming the steel is no longer magnetic but not heat the blade beyond this point.
Annealing
When you soften steel that had already been hardened, it is called annealing. To anneal steel, heat it to its critical temperature when it is no longer magnetic and then let it cool very slowly over the coarse of several hours, without quenching it. This is often done by leaving the steel in the forge after it been turned off. Annealing is often done when creating stock removal blades from recycled steel like automotive spring steel that had already been hardened. It's a lot easier to cut and grind annealed steel rather than hardened steel.
Martensite
Martensite is obtained when steel is rapidly quenched from critical temp or austenite. At this point, the steel will be very hard but also very brittle. After heat treating, blades will have to be tempered to reduce this brittleness.
Normalizing
A process very similar to annealing. Normalizing relieves stress built up in the steel during the forging process. It resets the steels crystalline structure. Heat the steel up to a non-magnetic state and then let it air cool slowly without quenching. Usually, the blade is removed from the forge and allowed to air cool. Normalizing steel allows the structure of the steel to be reset resulting in a blade that, once heat treated, will hold a better edge. Many believe stock removal blades do not need to be normalized because they do not have the added stress from hammering. Normalizing may, however, still be worthwhile because normalizing can still improve the steels internal structure. The result is a tighter grain and better edge retention. Normalizing and annealing are very similar processes. The actual difference between the two is the cooling time. Annealing steel should take much longer to cool in a turned off forge than normalized steel which air cools outside the forge in a fraction of the time.

Heat Treating
Heat treating for knife smiths is done with a forge, furnace, oxygen acetylene torches or in a heat-treating oven. Forges can be powered by coal, gas or even wood and can be homemade or commercially built. They are even available as hand crank tables for charcoal. They all basically serve the same function. Heating a blade to critical temperature. The better the forge, the faster and more controllable this can be done.
A forge is one of the key components of any knifemakers tool shop. It can be used to forge blades into shape, but most importantly, it can be used to anneal or harden knife blanks.
Forges come in different shapes and sizes. We prefer a gas forge because of its ease of use, transportability in and out of the garage workshop, and the huge variety that are available. Gas or propane forges can be home built or purchased with one, two or even four burners. They come with or without back doors, which can be closed to keep the heat in. Basically, it's pretty easy to find a forge for the size blades you plan to work on.
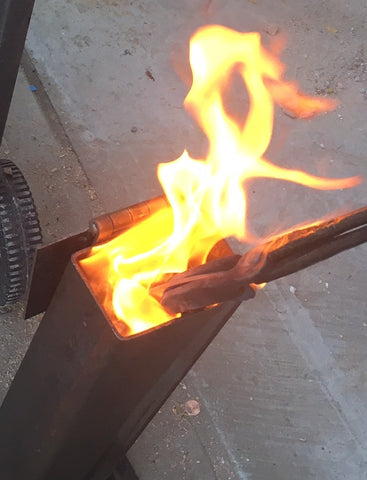
When heat treating high carbon steel in a gas forge, keep the bevel edge down away from contact with the direct flame. This will protect the thinner material from overheating. Move the blade back and forth evenly heating the blade until it is cherry red. A small magnet mounted to the outside frame of the forge can be used to quickly confirm when the blade reaches this critical temperature. Once the blade turns non-magnetic, make a visual note of the exact color. It's usually a nice even red, then let it get just a bit hotter so that the material is slightly orange and try to hold it there. Most heat-treating recipes call for keeping the material at that temperature for several minutes before quenching. Heat treating is all about consistency. Keep track of what material you use, the hold time at critical temperature, and the quenching oil temperature. Once you find a combination that works, stick with it. We have included in this book an assortment of heat-treating recipes for different materials.
Differential Heat Treating
Differential heat treating is done to produce a blade that has a very hard edge for superior edge retention and a slightly softer spine.

Oxyacetylene torches can be used to differentially heat treat by selectively only heating the bevel area to critical temperature.
This way the knife can take a lot of abuse without the spine being brittle and breaking. Differential heat treating can be accomplished in a couple ways, either preventing the spine from reaching critical temperature or not quenching the spine.
One way to insulate the spine is to paint on a layer of clay. Leave the portion of the blade exposed that you want to harden. The clay will prevent or insulate areas covered from reaching critical temperature. A few types that are commonly used are Satanite which is an insulating clay used for forges and Rutland's Furnace Cement, which is made to seal fireplace bricks. Both work well and will insulate or prevent the spine of the blade from reaching critical temperature during heat treating. Depending on the type of steel being heat treated a decorative Hamon can also be produced at the same time. Apply the clay in a wave-like pattern. After heat treating, when the blade is polished, you should be able to visually see the hamon line differentiating the hardened blade from the softer spine.
Another method of differential heat treating would be to only quench the bevel side of the blade. This is usually accomplished in a horizontal oil filled quench tank. This method allows the spine to cool slowly without hardening. A third method that can be used with oxyacetylene torches is to selectively heat only the bevel area to

A good quality, heat-treating oven will give you more control and better temperature accuracy which results in more consistent blade hardness.
critical temperature leaving the spine cooler.
Oxygen Acetylene Torches
Oxygen acetylene torches can be used to heat treat high carbon steel blades. Make sure the flame is set wide and then carefully try to evenly heat the blade to a point when it's non-magnetic. Then, quench it in oil. This simple, straight-forward heat-treating process works well and can be improved upon as funding becomes available for a forge or heat treating oven.
Heat Treating Ovens
Electric heat-treating ovens are available for knifemakers that want a little more control over the heat treating process. For materials like stainless steel, they are almost mandatory. We say “almost” because beginner and novice knifemakers always have the option of working with these high-end materials and then sending them out for heat treating. The size of the heat-treating oven and type of controllers are determined by the size of the blades you want to heat treat and the knifemakers budget. Keep in mind that a good quality, heat-treating oven will give you more control and better temperature accuracy which results in more consistent blade hardness.
Tool Wrap
For stainless steel and some tool steels, heat treating is done in a special heat-treating oven with precise temperature control. It's
Wrap stainless steel blades in tool wrap to prevent slag from forming. Every seam should be double folded, and tapped tight to make each envelope as airtight as possible.
highly recommended to wrap each blank in a stainless tool wrap. Tool wrap looks like a thick tin foil. Fold the wrap and make an envelope around the knife blank. Every seam should be double folded, and each seam should be tapped tight with a hammer or creased tight with a flat heavy object. A hammerhead works well here also. The object is to make each envelope as airtight as possible. This eliminates or reduces greatly the amount of slag developed during heat treating. You will know how airtight the tool wrap envelope is based on the amount of slag on the post heat treated blank. Tool wrap comes in two thicknesses #309 is for heat treating up to temperatures of 2240F. Part #321 is for heat treating up to 2000F. Which one you buy will depends on what material you need to heat treat. Some smiths add a small piece of organic material like paper or wood into the tool wrap envelope. This material should be placed near the tang and never in contact with the blade to prevent staining. The thought is that the organic material will burn up and consume any remaining oxygen from the envelope and therefore reduce any carbonization on the blade. We have tried it both ways and did not find any significant reduction in slag. What does make a difference is really getting a good tight seal on all the seams and corners of the tool wrap envelope.
Oil Quenching
Quenching or cooling a blade causes the blades crystal structure to change rapidly from austenite, which is non-magnetic, into martensite. Martensite is a hard and very brittle state. If you were to drop a blank after it had been quenched, it very well might break. A variety of special heat-treating quenching oils like Park AAA or Park #50 is available. The downside to these commercial quenching oils is the price. Used motor oil was once recommended and certainly could still be used. Motor oil is readily available and inexpensive. The downside to using it is that it contains additives and potential hazardous toxins. If you are going to use motor oil, make sure it's done outdoors or in a well-ventilated area. Nontoxic mineral or food grade oil is now the quenching oil of choice for most hobbyist. Vegetable or canola oil is less expensive than commercially produced quenching oils, does not contain the harmful toxins that motor oil does and actually smell pretty nice. The oil quench tank should be made from steel and should have a cover that can be
Keep in mind that flames may rise from the hot oil as the blade is quenched. Make sure you're not bent over looking down into the tank. Welding gloves and long handles tongues are highly advised to prevent burns.
used to smother flames if needed. Best practice is to preheat the oil to 120 degrees. Inexpensive digital thermometers with thermal coupler probes are available to test the temperature of the oil. Heating the oil should be done very carefully. Oil is not only a burn hazard but is very flamable. We use an inexpensive single burner cooktop. Another option is to heat up a piece of steel and submerge it prior to quenching the actual blade. Once the oil is preheated to the correct temperature range and the blade has reached non- magnetic status and been held at that temperature for the desired hold time. The blade should be quenched as quickly as possible after removing it from the forge. This has to be done before it has a chance to cool down. Keep in mind that flames may rise from the hot oil as the blade is quenched. Make sure you're not bent over looking down into the tank. Welding gloves and long handles tongues are highly advised to prevent burns. Quenching a blade can sometimes create a warp or bow in the blade. Check all blades after quenching by placing them on a flat surface and trying to rock them. We were once told that this warping could be reduced by minimizing the effects of the magnetic pull of the earth on the blade. We now position our quench tank so that it faces North. Although, originally thinking it was just a joke, we have had hardly any warpage since.
Plate Quenching
Plate, or air quenching, is used for stainless steel and other types of air hardening steels. Remove the hot blade form the heat- treating oven, and then as quickly and as safely possible, insert the blade between two aluminum plates. The plates can be solid or rectangular tubing. We recommend clamping the plates together and then blowing air from a compressor all around the blade to rapidly cool it. One reason we like tubing better than solid plates is that air can also be blown through the tube. We drilled and tapped the aluminum plates and bolted each to a carpenter’s vise. We left the bottom plate a little longer than the top to create its own table. The table is a resting spot which makes it a bit easier when moving the hot blades into position. It should only take a few minutes for the stainless knife blanks to cool. One of the major benefits of clamping the blanks between plates during this process is that they prevent warping. Once at room temperature, the blade could then go into a cryo treatment to obtain better edge retention.

Aluminum plates bolted to a carpenter’s vise. This set up makes it easy to clamp the blade flat while air cooling. Note the bottom plate is left long to act as a rest. This makes positioning the hot blade into the vise a little easier.
Cryogenic Treatment/ Sub-Zero Quench
Cryogenic treatment is done to some materials like stainless steel, immediately after the blade has returned to room temperature after plate quenching. The larger the range from heat-treating critical temperature down to below freezing, the better the edge retention on the finished product will be. Professional knifemakers use liquid Nitrogen stored in a Dewer tank. Dewer is a cryogenic vacuum container used for storing cryogens (such as liquid nitrogen). Nitrogen can last in a Dewer tank for upwards of a month. The cost of liquid nitrogen, however, often prevents the hobbyist, who may only make one or two knives per month from ever even considering cryo treatment. For knifemakers on a budget, dry ice can also be used. Compared to the -321 degrees Fahrenheit of liquid nitrogen, dry ice is only -95 degrees Fahrenheit. Do not let this deter you. Compared to not providing cryo at all, dry ice still provides a huge benefit. Dry ice can be stored in a small cooler or mixed into a slurry with either denatured alcohol, diesel or acetone. If using acetone, please be very careful as the liquid is extremely flammable. Break the dry ice into small pieces and drop them into the slurry. It will immediately start to boil. Now place the stainless blade into the slurry for ten to twenty minutes. Then remove and let the blade warm to room temperature. If you’re only treating one or two blades, don't even worry about mixing up a slurry. Just place the blade flat between two blocks of dry ice. The dry ice treatment is technically called a sub-zero quench.
Flatness Testing
After heat treating, place the blade on a known flat surface and rock it to check for flatness. Flip them over and check both sides. A minute amount of warping can be cleaned up during the final surface grinding. If the bend is more severe, it can often be corrected during the second tempering cycle by clamping the blade to a flat piece of steel. Insert steel spacers under both ends and then clamp the middle of the bowed-out section of the blade with a steel clamp. Tighten the clamp until just past straight and place the entire assembly into the oven for its second tempering cycle. Of course, if you tighten the clamp too much or attempt this when the blade is still too brittle from heat treating, you risk cracking the blade.
Tempering
Heat treating leaves the blades very hard but also brittle. After heat treating, blades have to be tempered to reduce the brittleness. Tempering is done by placing the blades in an oven. Usually 1-2 cycles at 350-400 degrees Fahrenheit for two hours and then letting them cool slowly, without opening the oven door. This process reduces the hardness just a little. The end result is a blade that is hard enough to hold an edge and strong enough not to snap.

Rockwell Hardness
Rockwell is a standardized test used to determine the hardness of steel. The procedure involves forcing a diamond point into the steel at a set pressure. The depth of penetration is then measured to determine the hardness of the steel. For knives, hardness higher than 65 on the Rockwell C scale will be hard to sharpen and brittle, while hardness below 57 will not hold an edge very well. When testing, remember to always remove heat treating decarbonization or scale prior to testing. The scale is often much harder than the actual material, and if left in place, can result in inaccurate testing.
Testing Files
Rockwell Hardness machines are often too expensive for the hobbyist knifemaker. A good alternative is a set of sequentially numbered hardness files. After hardening a blade, clean off the scale and then try each file until one bites into the steel. The files will not pinpoint the exact hardness of the particular blade but can let you know it is over 60 or under 55. For the knife smith that cannot justify a thousand dollars towards a Rockwell tester these are the perfect alternative.

Heat Treating Services
An often-overlooked option for the knifemaker is to send blanks out and have them professionally heat treated. This commercially available service is especially handy for those that want to experiment with stainless steel without the expense of purchasing a heat-treating oven. Heat-treating companies often have pricing that makes the service much more affordable with volume. For example, having 24 blades heat treated will end up having a much lower price per blade for the service. That does not mean you have to make 24 blades. Sending one or two blades might cost substantially more per blade, but for the hobbyist looking to make one or two quality knives or possibly an heirloom piece, this is a much less expensive option than buying a heat treating oven. Commercial heat-treating companies vary, so always confirm that the price includes Cryo treatment and tempering.
Check out our Knife making tools, huge assortment of topic specific how-to knife making videos, our Complete Online Guide Knife Making and our New Book Introduction to Knifemaking by Dan Berg and Jason Northgard.
